On this page
- Introduction
- Part 1: What Are Support and Resistance? — The Foundation
- Support — The Floor
- Resistance — The Ceiling
- The Psychology Behind Every S/R Level
- How Volume Confirms S/R Levels
- Part 2: The Six Types of Support and Resistance
- Type 1 — Horizontal Support and Resistance (Static Levels)
- Type 2 — Trendline Support and Resistance (Diagonal Levels)
- Type 3 — Dynamic Support and Resistance (Moving Averages)
- Type 4 — Fibonacci Support and Resistance (Mathematical Levels)
- Type 5 — Round Numbers (Psychological Levels)
- Type 6 — Pivot Points (Calculated Levels)
- Part 3: The Role Reversal — The Most Powerful S/R Concept
- Part 4: How to Draw Support and Resistance — Step by Step
- Step 1 — Start on the Higher Timeframe
- Step 2 — Move to the Trading Timeframe
- Step 3 — Use Zones, Not Lines
- Step 4 — Grade Each Level
- Step 5 — Update Regularly
- Part 5: Five Complete S/R Trading Strategies
- Strategy 1 — Support Bounce (Mean Reversion at Support)
- Strategy 2 — Resistance Breakout
- Strategy 3 — Break and Retest (Role Reversal Entry)
- Strategy 4 — Fibonacci Confluence Strategy
- Strategy 5 — Dynamic S/R (Moving Average Bounce)
- Part 6: S/R on Different Timeframes — Multi-Timeframe Analysis
- The Timeframe Hierarchy
- The Top-Down Approach
- NSE Intraday S/R Levels
- Part 7: Common S/R Mistakes and Exact Fixes
- Mistake 1 — Drawing Too Many Levels
- Mistake 2 — Using Lines Instead of Zones
- Mistake 3 — Ignoring Volume
- Mistake 4 — Trading Every Breakout Immediately
- Mistake 5 — Placing Stops Inside the S/R Zone
- Mistake 6 — Ignoring the Broader Trend
- FAQ
- Conclusion
- Ready to Trade These Levels on Real Stocks?

Support and Resistance: The Complete Trading Guide with Strategies (2026)
Master support and resistance trading in 2026. Learn how to identify all types of S/R levels, the role reversal concept, 5 complete strategies (bounce, breakout, retest, Fibonacci, dynamic), stop loss rules — with real NSE India examples.
Introduction
Every professional trader, regardless of their strategy — whether they use SMC, price action, indicators, or fundamentals — comes back to the same two concepts at the foundation of every analysis: support and resistance.
Support and resistance are not complicated. They are the price levels where the market has repeatedly paused, reversed, or made a decision. They are the floors that stop price from falling further. They are the ceilings that stop price from rising higher. And when those floors and ceilings break — when price punches through a level it has repeatedly respected — the resulting move is often one of the most powerful in trading.
Support and resistance work not because of indicators, but because of human psychology and institutional behaviour. Institutions, FIIs, and smart money cannot enter randomly. They place large orders near significant price levels — prior highs, prior lows, round numbers, and structural zones. That is why price reacts repeatedly at these zones.
Understanding support and resistance deeply means understanding why large pools of capital are accumulating at specific prices. It means knowing when a level is strong (tested many times, held by institutions) versus weak (barely touched, driven by retail). It means knowing when a break of a level is genuine versus a false breakout designed to trap traders before the real move.
This guide teaches you all of it — from identifying every type of support and resistance level, to five complete trading strategies with exact entry, stop, and target rules, to the most common mistakes and their fixes. With India-specific NSE examples throughout.
TL;DR — Key Takeaways
- Support is a price zone where buying pressure overcomes selling pressure — a floor. Resistance is a price zone where selling pressure overcomes buying — a ceiling
- The more times a level has been tested and held, the stronger it is
- The most powerful concept in S/R: when support breaks, it becomes resistance; when resistance breaks, it becomes support (Role Reversal)
- Six types of S/R: Horizontal (static), Trendline (diagonal), Dynamic (moving average), Fibonacci (mathematical), Round Numbers (psychological), and Pivot Points
- Five strategies: Bounce at Support, Resistance Breakout, Break and Retest, Fibonacci Confluence, Dynamic S/R (Moving Average)
- Stop loss always goes just beyond the S/R level — not inside it
- Volume is the truth detector for every S/R trade — high volume at the level confirms institutional participation; low volume reduces reliability
- Confluence (two or more S/R types at the same level) is the highest-probability S/R setup available
Part 1: What Are Support and Resistance? — The Foundation
Support — The Floor
Support is a price level or zone where buying pressure is strong enough to stop the fall of price. It is an area where buyers believe the price is "cheap" — where demand is sufficient to absorb selling pressure and halt or reverse the decline.
When price reaches a support level:
- Buyers who have been waiting for a "good price" enter their buy orders
- Traders who are short begin taking profits (buying back to close)
- New buyers attracted by the visible level step in
- Together, these buying forces overcome the selling and price either pauses or bounces
The more times a support level has held — stopping the price decline — the stronger and more significant it becomes. A level that has held three times is more significant than one that has held once. A level that has held across multiple timeframes (both on the daily and weekly chart) is more significant than one that only appears on one timeframe.
Resistance — The Ceiling
Resistance is a price level where selling pressure is strong enough to stop the rise of price. It is an area where sellers believe the price is "expensive" — where supply is sufficient to overwhelm buying pressure.
When price reaches a resistance level:
- Sellers enter, believing price has gone too high
- Traders who bought lower take profits (selling to close)
- New short-sellers attracted by the visible ceiling step in
- Together, these forces overcome the buying and price either pauses or reverses
The Psychology Behind Every S/R Level
Every support and resistance level is a memory. It represents a price at which a significant decision was previously made by a large number of market participants.
Consider this scenario: A stock trades at ₹400, rallies to ₹500 (which becomes resistance), then declines back to ₹400. The traders who bought at ₹400 and sold at ₹500 are sitting on profit and waiting for another opportunity to buy at ₹400. The traders who bought at ₹500 (resistance) are now sitting on losses and hoping to "get out even" if price returns to ₹500.
When price returns to ₹400 (the support), those profitable buyers step back in — generating fresh buying pressure. When price returns to ₹500 (now resistance), those loss-sitting traders exit — generating fresh selling pressure.
This psychological anchoring — the memory of price decisions at specific levels — is why support and resistance work. They are not arbitrary lines. They are the residue of real human decisions made at real prices.
How Volume Confirms S/R Levels
Volume is the truth detector for support and resistance. Strong volume at a level confirms institutional participation — large orders are being executed there. Weak volume reduces the significance of a level.
At support, look for rising volume on the bullish reversal candle — this shows real buying interest. At resistance, the rejection candle should show above-average volume — confirming that large sellers are present.
The volume rule for S/R: Any S/R level that was formed on high volume is stronger than one formed on thin volume. Any bounce or rejection at an S/R level that occurs on high volume is more reliable than one on low volume.
Part 2: The Six Types of Support and Resistance
Type 1 — Horizontal Support and Resistance (Static Levels)
The most fundamental and most widely used form. Horizontal levels are flat lines drawn at specific prices where the market has previously reversed.
Identifying horizontal levels:
Step 1 — Find swing highs and swing lows: A swing high is a candle (or group of candles) where price reached a peak before declining. A swing low is a candle (or group) where price reached a trough before rising. The highs become resistance; the lows become support.
Step 2 — Look for clusters: The most significant horizontal levels are where multiple swing highs or lows cluster at approximately the same price — showing repeated institutional decisions at that level.
Step 3 — Grade by number of touches: A level touched once — minor significance. Touched twice — moderate significance. Touched three or more times — major significance. On NSE, Nifty 50 technical setups such as the range between 22,200–22,700 representing a key support zone (multiple previous lows) is a textbook example of a multi-touch major horizontal support.
Step 4 — Check timeframe: Levels visible on the weekly chart are more significant than those only on the daily. Levels only visible on the 15-minute chart are intraday reference points, not major structural levels.
Pro Tip: When drawing horizontal support and resistance, use zones rather than exact price lines. Markets rarely reverse at a precise price to the rupee. Use a zone of 0.5–1% around the identified level. This accounts for the normal "noise" of price wicking slightly above or below the level before reversing — and prevents you from being stopped out by a brief wick beyond your line before the actual reversal occurs.
Type 2 — Trendline Support and Resistance (Diagonal Levels)
Trendlines are diagonal support and resistance lines drawn by connecting at least two significant swing points.
Uptrend support trendline: Connect at least two higher lows. The trendline slopes upward. When price declines to test the trendline, it represents support — the trendline "catches" the pullback.
Downtrend resistance trendline: Connect at least two lower highs. The trendline slopes downward. When price rallies to the trendline, it represents resistance — the trendline "caps" the recovery.
Start by drawing an upward trendline support. Connect at least two higher lows, then extend the line forward. The more price touches you get — aim for three or more — the stronger the line becomes. When the market respects this line, it behaves like a living safety net that moves with the price action.
Trendline quality rules:
- Minimum 2 touches to draw; 3+ touches to trade with confidence
- The angle should be natural — not too steep (unsustainable) or too shallow
- Redraw after any strong swing that changes the line angle
- A trendline break (close beyond the line) is a significant signal — the trend may be changing
Type 3 — Dynamic Support and Resistance (Moving Averages)
Moving averages act as dynamic, price-responsive support and resistance levels that move with the market.
The most significant moving averages for S/R on NSE:
20 EMA (Exponential Moving Average): The standard short-term trend support/resistance. In an uptrend, price frequently pulls back to the 20 EMA before continuing higher. In a downtrend, price frequently rallies to the 20 EMA before continuing lower. The 20 EMA is the most relevant MA for intraday and short-term swing traders.
50 SMA (Simple Moving Average): The intermediate trend support/resistance. More significant than the 20 EMA for swing traders. When price tests the 50 SMA after a prolonged uptrend correction, it represents a major decision point.
200 SMA: The most important moving average in global financial markets. It divides the long-term bullish (above) and bearish (below) regimes. The 50-day and 200-day moving averages are particularly significant, often indicating long-term trend reversals.
VWAP (for intraday): The intraday equivalent of the 20 EMA — the session's dynamic fair value line that acts as intraday support and resistance. For a full breakdown of VWAP-based entries, see how to trade intraday stocks in India.
Unlike fixed horizontal levels, moving averages shift position with each new candle. This means the support or resistance they provide is always current — reflecting recent price activity rather than a level from months ago.
Type 4 — Fibonacci Support and Resistance (Mathematical Levels)
Fibonacci retracement levels are semi-dynamic support and resistance levels derived from the Fibonacci number sequence and its ratios.
The key Fibonacci retracement levels:
- 38.2% — Shallow retracement, strong trend
- 50.0% — The midpoint (not strictly Fibonacci but universally observed)
- 61.8% — The "Golden Ratio" — the most significant Fibonacci level
The primary goal of Fibonacci retracement and extension levels is to help us identify support and resistance levels.
How to draw Fibonacci retracements:
- Identify a clear swing from a significant low to a significant high (for uptrend retracements)
- Apply the Fibonacci tool from the swing low to the swing high
- The 38.2%, 50%, and 61.8% levels are automatically drawn as potential retracement support
The strongest zones form where the 50% or 61.8% Fib level lines up exactly with your horizontal support or resistance. When price tests this confluence area, wait for a clear reaction candle, then enter.
The Fibonacci confluence rule: A Fibonacci level that coincides with a horizontal support or a moving average creates a confluence zone — two independent analytical tools pointing to the same price as significant. These confluence zones are among the highest-probability S/R setups available.
Type 5 — Round Numbers (Psychological Levels)
Round numbers — prices ending in 00 or 000 — act as self-fulfilling support and resistance because of the disproportionate number of orders placed at these levels.
On NSE, the most significant round-number levels:
- Nifty 50: 20,000 / 21,000 / 22,000 / 23,000 / 24,000 / 25,000
- Bank Nifty: 45,000 / 48,000 / 50,000 / 52,000
- Individual stocks: ₹100, ₹200, ₹500, ₹1,000, ₹2,000, ₹5,000
Many traders and institutions place buy/sell orders at round numbers — stop losses, take-profit orders, and new position entries. This concentration of orders creates self-fulfilling S/R as the sheer volume of orders at these prices creates the "barrier" effect.
Round number trading rule: When a round number coincides with a horizontal S/R level, the significance is amplified. A stock approaching ₹500 that also has a prior swing high at ₹498–502 is approaching an extremely strong resistance zone.
Type 6 — Pivot Points (Calculated Levels)
Pivot Points are mathematically calculated S/R levels based on the previous session's high, low, and close.
Standard Pivot Point formula:
Pivot Point (PP) = (High + Low + Close) ÷ 3

Resistance 1 (R1) = (2 × PP) - Low
Resistance 2 (R2) = PP + (High - Low)

Support 1 (S1) = (2 × PP) - High
Support 2 (S2) = PP - (High - Low)
These levels recalculate each session and provide objective, mathematically-derived S/R levels that are widely watched by institutional traders. The Pivot Point indicator draws clear support and resistance levels on the chart — removing subjectivity from level identification.
For NSE intraday traders, Daily Pivot Points (calculated from the previous day's NSE session) provide reliable reference levels that align well with the AMD cycle's manipulation and distribution phases.

Part 3: The Role Reversal — The Most Powerful S/R Concept
The Role Reversal is the single most powerful concept in support and resistance trading: when support breaks, it becomes resistance. When resistance breaks, it becomes support.
This is one of the most powerful concepts in technical analysis: when a support level is broken, it often becomes resistance. And when resistance is broken, it often becomes support. This "role reversal" gives traders powerful reference points for future trades.
Why Role Reversal works:
When support at ₹400 breaks (price falls decisively below ₹400):
- Traders who bought at ₹400 (support) are now losing money
- They are emotionally anchored to ₹400 and will sell when price returns to break even
- This creates a concentration of sell orders at ₹400 when price rallies back — the former support has become resistance
When resistance at ₹500 breaks (price rises decisively above ₹500):
- Traders who missed the breakout see ₹500 as the "new fair value" and buy pullbacks to it
- Short-sellers who were wrong at ₹500 cover (buy) when price retests the level
- This creates a concentration of buy orders at ₹500 on the pullback — the former resistance has become support
The Break and Retest entry: After a resistance breakout, wait for price to retest the broken resistance from above (as new support). This retest confirms the Role Reversal is active and provides a lower-risk entry into the breakout direction. The retest acts as validation: the level either holds in its new role or fails.
Trading the Role Reversal: Entry: When price retests the broken level (former resistance = new support, or former support = new resistance) and shows a reaction — a candlestick pattern or volume confirmation Stop: Just beyond the tested level (if the level fails its new role, the thesis is wrong) Target: The next significant S/R level in the direction of the breakout

Part 4: How to Draw Support and Resistance — Step by Step
Drawing accurate S/R levels is the foundational skill that determines the quality of every trade you take. Here is the complete process.
Step 1 — Start on the Higher Timeframe
Begin with the weekly or daily chart. Identify the major swing highs and swing lows over the past 6–12 months. These are your primary S/R levels — the ones watched by the largest number of participants.
Draw horizontal lines at each major swing high and low. Mark the ones with multiple touches as your primary levels. Mark single-touch levels as secondary.
Step 2 — Move to the Trading Timeframe
Drop to your trading timeframe (daily for swing, 15-minute or 5-minute for intraday). Identify additional S/R levels visible at this timeframe that are not visible on the higher timeframe.
The higher-timeframe levels always take precedence. A level on the weekly chart is more significant than one only visible on the 15-minute chart.
Step 3 — Use Zones, Not Lines
For each significant price area, draw a zone (a rectangle) rather than a single line. The zone represents the full price area where the S/R is active — typically 0.3–0.5% wide for large-cap NSE stocks.
Using zones rather than lines prevents the frustration of watching price wick slightly beyond your line before reversing — the wick was within the zone, which is valid price action.
Step 4 — Grade Each Level
Assign each level a grade:
- Grade A: 3+ touches, visible on weekly or daily, high volume at the level, round number coincidence
- Grade B: 2 touches, visible on daily or 4-hour
- Grade C: 1 touch, visible only on lower timeframes
Only trade at Grade A and Grade B levels. Grade C levels are reference points, not trade locations.
Step 5 — Update Regularly
S/R levels must be updated as market structure evolves. When a level breaks definitively, mark the Role Reversal (the former level's new role). When new swing highs/lows form, add them to your chart. Remove or archive levels that have been clearly broken through.
Part 5: Five Complete S/R Trading Strategies
Strategy 1 — Support Bounce (Mean Reversion at Support)
The most fundamental S/R strategy — buy when price reaches a confirmed support level and shows reversal signs.
Setup conditions:
- Identify a Grade A or B horizontal support level (3+ touches, high volume at the level)
- Price has declined toward this support from a higher level (a downward move approaching the floor)
- Price reaches the support zone
- A bullish candlestick pattern forms within the support zone (Hammer, Bullish Engulfing, Morning Star, Dragonfly Doji)
- Volume on the bullish candle is above average (confirming institutional buying at the level)
- RSI is below 40 (or below 30 for deeper support) — confirming oversold conditions at the support
Entry: At the close of the confirming bullish candlestick within the support zone
Stop Loss: Just below the support zone's lower boundary — the absolute bottom of the zone. If price closes below the full support zone, the level has failed and the long thesis is wrong.
Target:
- First target: The resistance level above (the previous swing high or round number resistance)
- For detailed target logic: Zerodha's Varsity example of identifying resistance as a target for a support-entry trade demonstrates the complete trade design: Entry → ₹206, Stoploss → ₹202, Target → ₹215 (next resistance)
NSE example: HDFC Bank declines to a major horizontal support at ₹1,600 (tested 3 times over the past 6 months). RSI reaches 32. A Hammer forms at ₹1,601 with volume 2.1× the 20-day average.
- Entry: ₹1,612 (close of confirmation candle next day)
- Stop: ₹1,588 (below support zone bottom)
- Target: ₹1,690 (prior swing high resistance)
- Risk: ₹24 / Reward: ₹78 / R:R = 3.25:1 ✓
Pro Tip: The highest-probability support bounces occur at the third or fourth test of a level. The first test collects the most aggressive buyers. The second test tests their conviction. By the third test, most retail traders have given up on the support — which is precisely when institutional buyers step in decisively with the volume that produces the sharp, sustained bounce.

Strategy 2 — Resistance Breakout
Trading the moment a significant resistance level is broken — capturing the continuation move as price escapes a ceiling that has held multiple times.
Why breakouts are powerful: The more times resistance has held, the more sell orders and short-sell orders have accumulated just above it. When price finally breaks through, all those short positions are instantly wrong — their stop losses (buy orders above resistance) are triggered, adding buying fuel to the breakout momentum.
Setup conditions:
- Identify a Grade A horizontal resistance (3+ touches, high volume at the level)
- Price approaches the resistance from below on increasing bullish momentum
- Price breaks above the resistance with a close above the level (not just a wick)
- Volume on the breakout candle is at least 1.5× the 20-day average — confirming institutional participation
Entry:
- Aggressive: At the close of the first candle that closes above resistance
- Conservative: On the opening of the next session after the breakout close
Stop Loss: Below the resistance level that was just broken — now acting as new support via Role Reversal. If price falls back below the broken resistance, the breakout has failed.
Target:
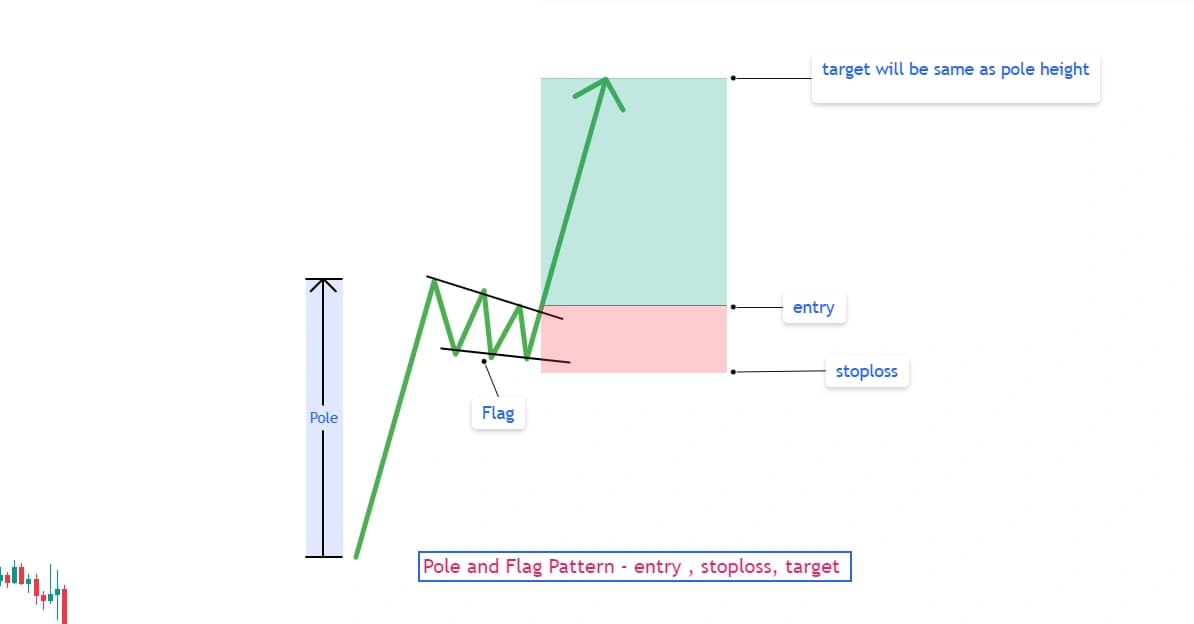
- Measured move: Calculate the distance from the most recent swing low to the resistance level. Project that same distance above the resistance breakout. This gives the minimum expected move.
- Prior swing high: The next significant resistance above
The false breakout trap: Not every resistance break is genuine. A false breakout occurs when price briefly moves beyond a zone before reversing sharply, often trapping traders who entered too early. Wait for a candle to fully close above resistance — not just a wick — to distinguish genuine breakouts from false ones.
Strategy 3 — Break and Retest (Role Reversal Entry)
The highest-confidence entry method for breakout trading. Instead of entering the breakout immediately, wait for price to pull back and test the broken level from the other side — confirming the Role Reversal before entering.
The sequence:
- Price breaks a significant resistance (or support)
- Price continues in the breakout direction for 1–5 sessions
- Price pulls back and retests the broken level from the new side (broken resistance now acts as support)
- The level holds on the retest (price bounces from the former resistance — now support)
- A bullish candlestick confirmation appears at the retest level
- Enter the trade
Why the retest entry is superior to the immediate breakout entry:
The retest confirms the Role Reversal is active. The broken resistance is genuinely acting as new support. The pullback provides a better entry price (closer to the broken level = tighter stop, better R:R). And the confirmation candle at the retest provides a definitive timing signal.
A broken resistance often acts as support on the return move. When the retest holds and price moves away from the level, the original signal is confirmed. The trend tends to continue from that point.
Entry: At the close of the confirming bullish candlestick at the retested level
Stop Loss: Below the retested level's zone. If price falls back through the retested level, the Role Reversal has failed and the position must be closed.
Target: The same measured move target as the immediate breakout entry
The key risk — the failed retest: Sometimes the retest does not hold. Price returns to the broken resistance, tests it as new support, and then falls back below it. This is a failed retest — the breakout was not genuine. Your stop below the zone protects you from this scenario.
Price forms an ascending triangle with resistance at ₹200. Breaks above ₹200 with strong momentum. Retests ₹200 and forms a bullish engulfing. Enter long, SL at ₹195, TP at ₹220+.

Strategy 4 — Fibonacci Confluence Strategy
The Fibonacci Confluence strategy identifies the highest-probability S/R zones by finding where Fibonacci retracement levels align with horizontal S/R or moving averages — creating confluence zones where multiple independent analytical tools point to the same price.
Why confluence multiplies probability: A single horizontal support has one reason to hold. The same horizontal support that also aligns with the 61.8% Fibonacci retracement AND the 50 SMA has three independent reasons to hold. Each additional confluence layer increases the probability that the level will produce a tradeable reaction.
Step-by-step Fibonacci confluence process:
Step 1 — Draw Fibonacci retracement: Identify the most recent significant swing from low to high (for uptrend retracement levels). Apply the Fibonacci tool from the swing low to the swing high. The 38.2%, 50%, and 61.8% levels are your potential support zones.
Step 2 — Find horizontal level alignment: For each Fibonacci level, check whether a prior horizontal support (swing low, consolidation zone, round number) aligns within 0.5–1% of the Fibonacci level.
Step 3 — Check moving average alignment: Does the 20 EMA, 50 SMA, or 200 SMA fall near the same price area?
Step 4 — Grade the confluence:
- One level: Low priority
- Two levels coinciding: Medium priority
- Three or more levels coinciding: High priority — trade this zone with full conviction
Entry: When price reaches the confluence zone and a candlestick reversal pattern forms (Hammer, Bullish Engulfing, Morning Star)
Stop Loss: Below the deepest Fibonacci level in the confluence zone (below the lowest of the S/R levels present)
Target: The previous swing high (for Fibonacci retracement entries in uptrends)
NSE example: TCS declines from a swing high of ₹3,500 to a swing low of ₹3,000. The 61.8% Fibonacci retracement of this move is at ₹3,309. A prior horizontal support (swing low from 3 months ago) sits at ₹3,290–₹3,310. The 50 SMA is at ₹3,295. All three levels coincide in the ₹3,290–₹3,310 zone — maximum confluence.
- Entry: ₹3,315 (Bullish Engulfing at confluence zone close)
- Stop: ₹3,270 (below the entire confluence zone)
- Target: ₹3,490 (prior swing high)
- R:R: 3.9:1 ✓

Strategy 5 — Dynamic S/R (Moving Average Bounce)
Trading price bounces and rejections at key moving averages — the 20 EMA, 50 SMA, and 200 SMA — which act as dynamic, continuously updating support and resistance.
This strategy is particularly effective for swing traders who want to enter established trends at the optimal pullback level, using the moving average as the structural support entry point.
Strategy 5A — Moving Average Support Bounce (Trend Continuation):
Setup:
- Stock is in an established uptrend (higher highs and higher lows, price above 200 SMA)
- Price pulls back toward the 20 EMA or 50 SMA during a correction
- Price tests the moving average — ideally with a wick below the MA before closing above it
- A bullish candlestick forms at the MA (Hammer, Bullish Engulfing)
- Volume contracts during the pullback (weak selling) and expands on the bounce candle (strong buying)
Entry: At the close of the bullish confirmation candle at the moving average
Stop: Below the moving average — specifically, below the day's low at the MA test. If price closes below the 50 SMA after the bounce entry, the intermediate trend support has broken.
Target: Most recent swing high
Strategy 5B — Moving Average Resistance Rejection (Downtrend Continuation):
In a downtrend (price below 200 SMA, making lower highs and lower lows), the 20 EMA and 50 SMA act as dynamic resistance. When price rallies from below to test these moving averages and forms a bearish rejection candle (Shooting Star, Bearish Engulfing), it is a short entry signal.
Price trades above the 200 day and pulls back to the 50 day near 128. The first test prints a strong bounce candle.
Strategy 5C — The 200 SMA as Major S/R: The 200 SMA separates the long-term bull trend (above) from the bear trend (below). When price tests the 200 SMA for the first time after an extended trend, the reaction is typically large because of the number of participants watching this level. A Hammer or Bullish Engulfing at the 200 SMA in a long-term uptrend is a high-conviction long entry.
Part 6: S/R on Different Timeframes — Multi-Timeframe Analysis
The Timeframe Hierarchy
Not all S/R levels are equal. Levels on higher timeframes carry more weight because they are watched by more participants and represent more significant historical price decisions.
| Timeframe | S/R Significance | Best For |
|---|---|---|
| Weekly | Highest — major institutional levels | Position trading, major swing trades |
| Daily | High — primary swing levels | Swing trading (3–15 day holds) |
| 4-Hour | Moderate | Short-term swing (2–5 day holds) |
| 15-Minute | Low — intraday reference | Day trading, intraday entries |
| 5-Minute | Very Low — session reference | Scalping, precise intraday entries |
The Top-Down Approach
Always identify S/R on the highest relevant timeframe first, then drop to lower timeframes for entry timing.
Example:
- Weekly chart: Major support at ₹1,500 (3 prior weekly lows here)
- Daily chart: Horizontal support cluster at ₹1,490–₹1,510, confirmed
- 15-minute chart: Price reaches the zone, watch for a Hammer or Bullish Engulfing for entry timing
The weekly support provides the "why." The daily confirms the level. The 15-minute provides the "when" (entry timing). This top-down approach produces higher-quality trades than analysing a single timeframe in isolation.
NSE Intraday S/R Levels
For NSE intraday traders, the relevant S/R hierarchy is:
Daily chart levels (primary): Previous day's high and low, weekly high and low, round numbers, significant swing highs and lows from the past 2–4 weeks.
Intraday levels (secondary): Pre-market high and low (the opening range), the morning session high and low (established by 10:00 AM IST), VWAP (dynamic intraday S/R).
The most reliable NSE intraday S/R setups occur when an intraday level (like the pre-market high) coincides with a daily-chart horizontal S/R level. This multi-timeframe alignment creates the strongest intraday reactions — exactly the kind of setup the Dhanith Intraday Screener is built to surface.

Part 7: Common S/R Mistakes and Exact Fixes
Mistake 1 — Drawing Too Many Levels
Drawing a line at every price that has ever paused, producing a chart covered in 20+ horizontal lines. The resulting noise is impossible to trade from — every level is "important" so none is.
The fix: Apply strict criteria for drawing levels. Only mark swing highs and lows where price made a clear, definitive reversal — not every minor wiggle. Grade each level. Only trade Grade A and B levels. A clean chart with 3–5 major levels is far more actionable than a busy chart with 20+ lines.
Mistake 2 — Using Lines Instead of Zones
Drawing a single thin line at a precise price and placing stops exactly there. Price wicks through the line and triggers the stop before reversing exactly as expected.
The fix: Use zones — rectangles covering 0.3–0.5% of the stock price around the identified level. The zone accounts for the normal wick-through behavior at key levels. Stops go beyond the zone, not at the line.
Mistake 3 — Ignoring Volume
Entering at a support or resistance level based purely on price location, without checking whether volume confirms the reaction is real.
The fix: Always check the volume bar at the S/R reaction candle. A bounce from support on above-average volume is a meaningful institutional reaction. The same visual bounce on below-average volume is retail noise that frequently fails. Volume is mandatory confirmation for every S/R trade.
Mistake 4 — Trading Every Breakout Immediately
Entering every resistance breakout immediately on the breakout candle, without waiting for confirmation that the break is genuine. Many breakouts fail — price returns below the broken level within 1–3 sessions, often after a deliberate liquidity sweep of the level.
The fix: Wait for the Break and Retest before entering breakout trades. The retest confirms the Role Reversal is active and the breakout was genuine. Yes, you miss a portion of the initial move — but the reduced false breakout rate more than compensates over 30+ trades.
Mistake 5 — Placing Stops Inside the S/R Zone
Setting a stop loss at the S/R line itself (inside the zone) rather than beyond the full zone. Price tests the level, wicks slightly beyond the line (but within the zone), triggers the stop, and then reverses as expected.
The fix: Stop loss goes beyond the S/R zone's furthest boundary — not at the line, not inside the zone, but just outside it. The zone is the area of significance; a move THROUGH and beyond the zone is the genuine invalidation signal.
Mistake 6 — Ignoring the Broader Trend
Buying every support level regardless of the primary trend direction. Buying support in a strong downtrend consistently produces losing trades as the downtrend eventually breaks every support level.
The fix: Apply the trend filter. In an uptrend (price above 200 SMA), buy support levels — the trend provides the momentum to sustain bounces. In a downtrend (price below 200 SMA), only short resistance levels — counter-trend support bounces are temporary and frequently fail. Trade S/R in the direction of the primary trend.
FAQ
Q: What is support and resistance in trading? Support is a price level or zone where buying pressure consistently overcomes selling pressure — a floor that stops or reverses price declines. Resistance is a price level where selling pressure consistently overcomes buying — a ceiling that stops or reverses price advances. They work because of market psychology: participants remember prices where significant decisions were previously made, creating self-fulfilling concentrations of buy and sell orders at those levels.
Q: How do I identify support and resistance levels? Identify support and resistance by finding significant swing highs (for resistance) and swing lows (for support) on your chart. The more times a level has been tested and held, the more significant it is. Use the higher timeframe (weekly or daily) to identify major levels, then drop to your trading timeframe for entry timing. Draw zones rather than lines (0.3–0.5% wide) to account for normal wick-through behavior. Confirm with volume — levels formed on high volume and tested with high volume reactions are the most reliable.
Q: What is support turned resistance? Support turned resistance (also called role reversal) is one of the most powerful concepts in technical analysis: when a support level is broken by a decisive price close below it, that same level often becomes resistance on subsequent rallies. This happens because traders who bought at the former support are now losing money and will sell when price returns to their entry level. The mirror applies: broken resistance often becomes new support on pullbacks.
Q: What is the best strategy for trading support and resistance? The Break and Retest strategy is the highest-confidence S/R approach because it combines the momentum of the initial breakout with the confirmation of the Role Reversal. Wait for a significant resistance to break (with volume), let price pull back to test the broken level from above (now acting as support), look for a bullish candlestick at the retest, and enter with a stop below the tested level. This approach produces lower false signal rates than entering the breakout immediately.
Q: How does Fibonacci relate to support and resistance? Fibonacci retracement levels (38.2%, 50%, 61.8%) are semi-mathematical S/R levels that identify where price is likely to find support during an uptrend correction or resistance during a downtrend bounce. The most powerful S/R setups occur when a Fibonacci level coincides with a horizontal support/resistance and a moving average — creating a confluence zone where three independent analytical methods point to the same price. These confluence zones produce significantly higher-probability reactions than any single level alone.
Q: How do I use support and resistance with NSE intraday trading? For NSE intraday trading, combine three levels: (1) the daily chart horizontal S/R (prior swing highs/lows, round numbers), (2) the pre-market opening range high/low (from 9:00–9:15 AM IST), and (3) VWAP (the dynamic intraday S/R). The highest-probability NSE intraday setups occur when price tests a level where all three align — for example, when VWAP coincides with the pre-market range boundary AND a daily chart round number. Add a candlestick confirmation (Hammer, Bullish Engulfing) and volume above session average for a complete, high-quality entry.
Conclusion
Support and resistance are the most fundamental concepts in all of technical analysis. Before indicators, before candlestick patterns, before moving averages — there is support and resistance.
Every other tool in the trader's toolkit ultimately comes back to identifying where price is likely to pause, reverse, or break through. Bollinger Bands show when price is at a statistical extreme — which is, at its core, a dynamic form of S/R. RSI divergence warns when momentum at a price extreme is weakening — which is a confirmation tool for S/R levels. Candlestick patterns are most powerful when they form at S/R levels — providing the timing for S/R-based trades.
Three principles to carry forward:
1. Use zones, not lines. The market doesn't reverse at a precise price. It reverses within a zone. The zone is where orders cluster. Draw your levels as rectangles and let price behave naturally within the zone rather than forcing exact-price logic onto an inherently imprecise mechanism.
2. The Role Reversal is your most powerful concept. Every time a support breaks, mark it as new resistance. Every time resistance breaks, mark it as new support. These flipped levels provide the most reliable entry points in all of trading — the Break and Retest entry specifically captures institutional order flow at the precise moment it confirms a new directional commitment.
3. Confluence multiplies probability. A single horizontal level is interesting. A horizontal level that coincides with a Fibonacci retracement AND a moving average AND a round number is a Grade A, maximum-priority trade location. Always seek confluence before entering any S/R trade.
Further reading: Important Candlestick Patterns: The Complete Guide | Order Blocks: The Complete Mastery Guide | Technical Analysis Mastery: The Complete Guide | Bollinger Bands Trading Strategy | Volume Analysis Trading Strategy | Fair Value Gaps: The Complete Mastery Guide | SMC Killzones: The Complete Trading Guide | Inducement (IDM): The Complete SMC Guide | Premium and Discount Zones: Complete SMC Guide | SMC Market Structure: BOS, CHoCH and Strong vs Weak Levels
Ready to Trade These Levels on Real Stocks?
→ Open the Dhanith Intraday Screener — find today's NSE stocks reacting at major support and resistance zones on above-average volume
→ Calculate Your Risk Before Every S/R Trade — know your exact share count, stop distance beyond the zone, and maximum loss before you enter
→ Log Your S/R Trades in the Dhanith Journal — track which levels, timeframes, and confluence setups produce your best win rate
Disclaimer: This article is for educational purposes only and does not constitute financial or investment advice. Trading involves significant risk of capital loss. Past performance does not guarantee future results. Always use proper risk management.
Have a question about this article?
Comment on our latest Instagram post or send us a DM — we reply to every one.
@dhanith_officialWas this article helpful?
Click to rate
Founder, Dhanith Trading
7+ years trading Nifty, Bank Nifty, NSE stocks, and commodities — specializing in Smart Money Concepts (SMC) and ICT price action. Founder of Dhanith — a trading journal, intraday screener, and risk tools platform built for retail traders.
Dhanith Newsletter
Enjoyed this article? Get more like it.
New trading guides, candlestick patterns, SMC strategies, and tool updates — straight to your inbox. Free, for Indian traders.
No spam. Unsubscribe anytime.
Continue Reading